
- Rclone
- Downloading and installation of rclone tool
- Linux - manual installation into the user profile
- Windows - manual installation in to user profile
- Basic configuration of rclone
- Rclone configuration using the command line
- Rclone configuration using graphical user interface
- Uploading the data from your local machine
-
- Configuration file
- Rclone basic controls
- Listing buckets and directories
- Creation of the bucket, copying, deletion...
- Directory syncing
- Data integrity checks
- Configuration and controls of encryted bucket
languages:
  - en
  - cs
markdown_extensions:
    - toc:
        baselevel: 2
        toc_depth: 2
Rclone
This guide serves for rclone tool configuration. Rclone is the swiss knife for connection to multiple types of storage. However, the following guides are limited only to Object Storage namely S3 service. The following guides are suited for Windows users as well as Linux users. Using rclone tool for S3 enables the creation of the buckets, syncing folders, uploading and downloading files, and much more.
Downloading and installation of rclone tool
Firstly you need to download and unzip the desired rclone version according to the system you operate.
!!! warning We strongly recommend to use up-to-date versions of rclone tool available at rclone websites. Using rclone version from system repositories can cause some errors due to the outdated rclone version. In case of a manual installation into the user profile, see below, you can use for an update following command:
rclone selfupdateLinux - manual installation into the user profile
We need to unzip the rclone archive after download.
unzip rclone-v1.59.1-linux-amd64.zipThen we need to copy rclone binary file into the pre-prepared bin folder in the user profile/home.
cp ./rclone-v1.59.1-linux-amd64/rclone /home/user/bin/In the last step, we need to put the path to the rclone binary file into PATH environment variable.
PATH=/home/user/bin:$PATH???+ note "Persistent setup" For persistent presence of the rclone binary file path in the PATH variable you can add the following line into .bashrc file:
echo 'PATH=/home/user/bin:$PATH' >> .bashrcAlternatively you can place the rclone binary file into the system path:
/usr/local/binIn the end, we can make a quick check of PATH variable, whether the desired path is present.
echo $PATH!!! warning
In case you have installed the rclone using the steps above, you can then use the following command to update rclone:
rclone selfupdate
2022/08/25 11:54:07 NOTICE: Successfully updated rclone from version v1.59.0 to version v1.59.1
Windows - manual installation in to user profile
Firstly you need to prepare bin directory in your user profile, where we will place rclone.exe file. Please prepare the directory in your user profile. You can just put the following command into the file browser:
%USERPROFILE%In the displayed directory you can click right mouse button -> New –> Directory/Folder. The directory should be named bin. Then move the rclone.exe file into it. The file rclone.exe is present in the unzipped rclone archive, which you downloaded from the rclone websites.
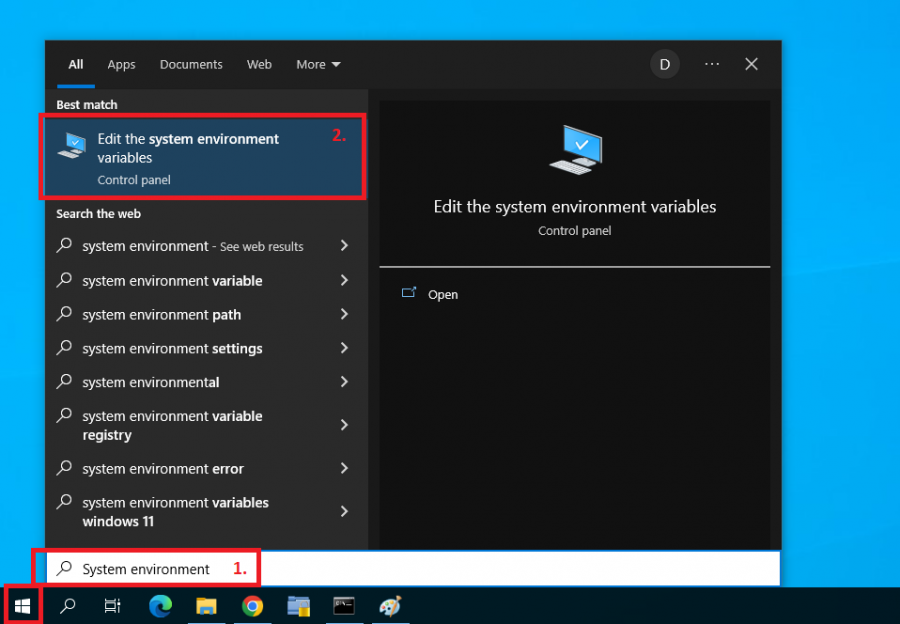
In the next step click to Start (1) and search for Edit the system environment variables (2).
Then click at Environment variables (1) in the displayed window.

In the section User variables for UserXY (1) you will select the line with variable Path (2) and then you will click on the Edit (3) button.

You can add the new path by clicking on the New (1) button and then you have to insert the path to the pre-prepared “bin” folder (2), see below. The setup is then confirmed by clicking on the OK (3) button.
%USERPROFILE%\bin
In the end, you will click OK and Apply.
!!! warning
In case you have installed the rclone using the steps above, you can then use the following command to update rclone:
rclone selfupdate
2022/08/25 11:54:07 NOTICE: Successfully updated rclone from version v1.59.0 to version v1.59.1
Basic configuration of rclone
Below you can find the guide for the elementary configuration of rclone tool. Below are two guides. First describes configuration using the command line and second guide describes configuration using the graphical user interface.
Rclone configuration using the command line
!!! warning To be able to configure the rclone tool using this guide first, you have to download, unzip and install rclone, the guide can be found in the first section.
Rclone has a configuration wizard, which will guide you step-by-step through the configuration of your S3 data storage.
???+ note "Command line in Windows and Linux" Windows users need to run Command Prompt and then run the command below. Linux users can open the terminal window and then run the command below.
**```rclone config```**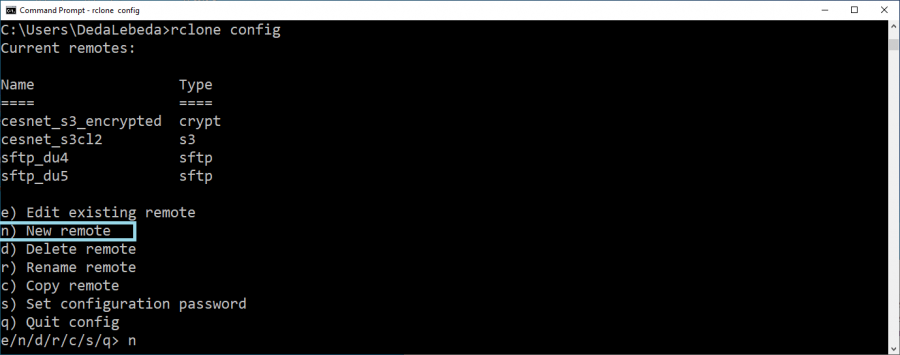
From the list of options, we will choose New remote via inserting n letter. Then we need to type the name of our connection/storage, e.g. cesnet_s3. Then we will choose the Option Storage, here Amazon S3 Compliant Storage Providers…

In the next step, we need to choose Option provider, here Ceph Object Storage.

Then it is necessary to choose how to enter S3 credentials. Here we choose Enter AWS credentials in the next step.

In the next steps we enter our credentials access_key_id and secret_access_key which we obtained from the administrator or which we generated.

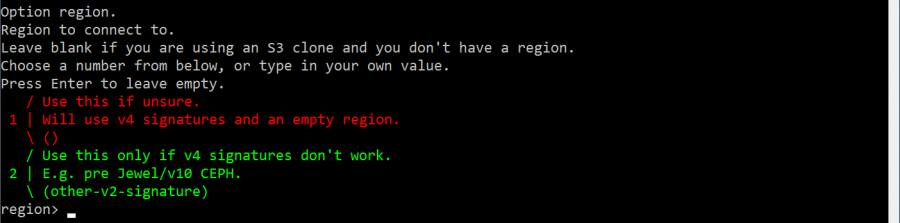
Then we need to select Option region. We will leave this option empty and then continue with Enter.
Then we need to insert Option endpoint according to the data center, where we have generated the credentials, here for example s3.cl2.du.cesnet.cz.

Next is Option location_constraint. We will leave this option empty and then continue with Enter.

Next point si Option acl, here we can either choose Owner gets FULL_CONTROLL, or we can leave this option empty and continue with Enter.

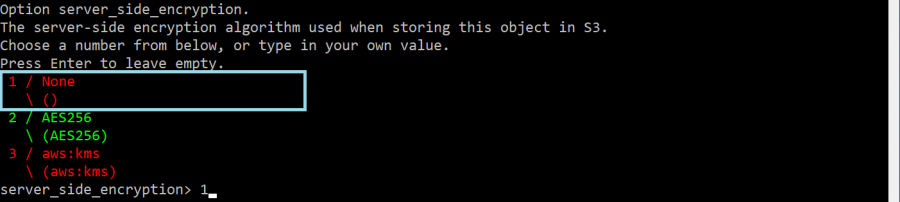
In the next step, we need to choose Option server_side_encryption, here we pick the option None.
Then we can choose Option see_kms_key_id, here we pick the option None.

In the next step we can choose option Edit advanced config, here we choose No, option n.

In the last step, we check the configuration and we will confirm it by typing y letter.

Rclone configuration using graphical user interface
!!! warning To be able to configure the rclone tool using this guide first, you have to download, unzip and install rclone, the guide can be found in the first section.
Firstly you need to run the GUI. Windows users need to open Command Prompt and run the command below. Linux users need just open the terminal window and run the command below.
rclone rcd --rc-web-guiThe next steps are identical for Windows and Linux.
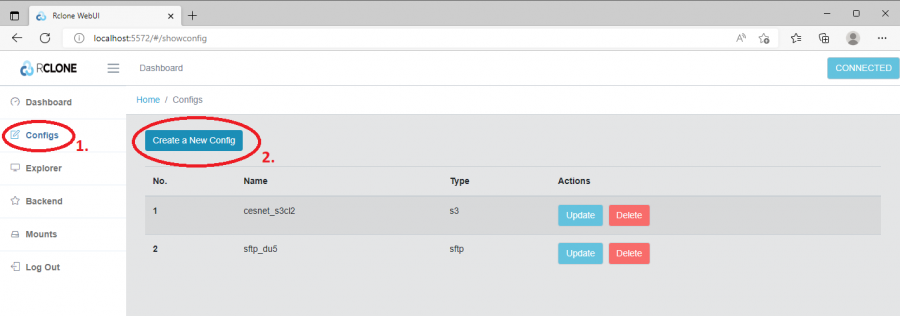
After starting up the graphical interface we click in the left menu on the Configs (1) button and then on the Create a New Config (2) button.
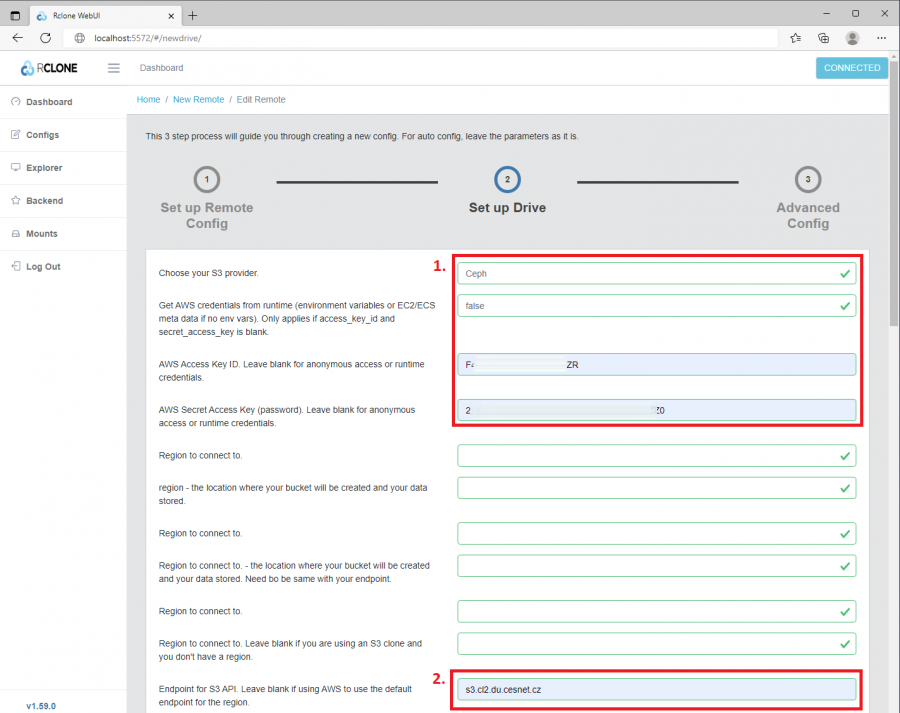
In the displayed window, we insert the connection name in our example cesnet_s3cl2 and then we choose the option Amazon S3 Compliant Storage Providers.

In the next step, we need to insert credentials (1) which we obtained from the administrator or which we generated. You have to insert Ceph into the line denoted Choose your S3 provider. Then we need to insert the S3 endpoint address (2). Then we can click Next.
!!! warning Please be careful during the modification in the Configs section. Rclone GUI sometimes does not save the changes in the configuration. We strongly recommend to cross-check the configuration file after saving.
Uploading the data from your local machine
After the configuration, we can start to transfer the data.
In the left menu click on the Explorer (1) button. Then select the name of configuration (2), for example cesnet_s3cl2. Then you click on the Open (3) button. Then there should be a window with the buckets and files from the configured data storage.

!!! warning Graphical user interface of rclone DOES NOT SUPPORT creation of empty buckets and directories. If you copy your data from the local machine you have to copy the directory with data. Alternatively, you can prepare empty buckets using command line.
If you wish to upload your data then in the displayed window click on upload icon (1). Then you can select the data from your disk or drag and drop them into the window.

Configuration file
!!! warning Configuration file can be found in the location described below. In the configuration file are saved the credentials and all selected options.
???+ note "Windows config file"
C:\Users\DedaLebeda\AppData\Roaming\rclone\rclone.conf
[cesnet_s3]
type = s3
provider = Ceph
access_key_id = my-access-key
secret_access_key = my-secret-key
endpoint = s3.cl2.du.cesnet.cz
acl = private
???+ note "Linux config file"
~/.config/rclone/rclone.conf
[cesnet_s3]
type = s3
provider = Ceph
access_key_id = my-access-key
secret_access_key = my-secret-key
endpoint = s3.cl2.du.cesnet.cz
acl = private
Rclone basic controls
!!! warning All available commands for rclone can be listed using the command
    rclone help

Alternatively you can find rclone guide on the [rclone websites](https://rclone.org/commands/). Below are described the selected commands to control buckets, directories and files.
Listing buckets and directories
Listing of the available profiles/connections.
rclone listremotes
cesnet_s3_encrypted:
cesnet_s3cl2:
sftp_du4:
sftp_du5:
Listing of buckets of the selected profile/connection.
rclone lsd cesnet_s3cl2:
-1 2020-11-11 08:53:48        -1 111
-1 2022-07-28 10:03:20        -1 test
Creation of the bucket, copying, deletion...
Creation of the new bucket.
rclone mkdir cesnet_s3cl2:test-bucketDeletion of the bucket.
rclone rmdir cesnet_s3cl2:test-bucketCopying the files.
!!! warning Rclone cannot create empty folders, see the error below.
    rclone mkdir cesnet_s3cl2:test-bucket/empty-directory
    2022/08/24 12:18:36 NOTICE: S3 bucket test-bucket path empty-directory: Warning: running mkdir on a remote which can't have empty directories does nothing

The solution is to use a full path inside the bucket including a non-existing directory during copying. **In case you type non-existing directory rlone will create it**, see the example below.
Let's copy the files:
rclone copy /home/user/test_file1.pdf cesnet_s3cl2:test-bucket/new-dir1/new-dir2/Then we can check the files using ls command, where we can see that the folders have been created. Namely new-dir1 a new-dir2:
rclone ls cesnet_s3cl2:test-bucket
3955866 new-dir1/new-dir2/test_file1.pdf
File deletion.
To delete a particular file, we can use either command deletefile or the command delete to remove all files in the given path.
rclone deletefile cesnet_s3cl2:test-bucket/new-dir1/new-dir2/test_file1.pdf!!! warning In case you delete the only file (object) in the directory resulting in empty directories structure the empty directories will be deleted! Directories are in object technology always represented by the name of a particular object (file), deletion of empty directories is thus expected behavior.
Directory syncing
To sync the directories you can use the option sync. Synchronization is affecting the content only on the target side, no changes are performed on the source side.
Below is the exemplary command of rclone sync. The command contains recommended options which are described below.
rclone sync --dry-run --progress --fast-list /home/user/source-dir cesnet_s3cl2:test-bucket/???+ note "Syncing process" The command above always syncs the content of the source directory. It does not matter if you DO NOT use the slash at the end of the source directory. Behavior of rclone is in this perspective different than rsync behavior.
The command above contains several recommended options.
Option dry-run allows performing the dry-run sync with listing the potential changes.
--dry-runOption progress allows seeing the continuous progress of the sync.
--progressOption fast-list allows limiting the number of API requests. This option can enhance the transfer of larger datasets. It uses one request to read the information about 1000 objects and store it in the memory.
--fast-listOption interactive allows interactively deciding which change (on the target data storage) we want to accept or reject.
--interactiveData integrity checks
???+ note "Enhancing the speed of checking"
All commands related to data integrity check should contain --fast-list option, see above. Using the --fast-list option will enhance the speed of the integrity checks.
Rclone allows testing the integrity of transferred data.
rclone check --fast-list C:/Users/Alfred/source-for-sync/my-local-data cesnet_s3cl2:test-syncThe command checks the checksums on the source side as well as on the target side. For fast checks you can use the option --size-only, where are checked only file sizes.
rclone check --fast-list --size-only C:/Users/Alfred/source-for-sync/my-local-data cesnet_s3cl2:test-sync!!! warning
To check data integrity on the encrypted buckets please use the option cryptcheck which is described in the guides related to encrypted buckets. In the case of using the option check on the encrypted volume, there will occur the forced download of all data in the checked path. Forced downloads are unnecessary and can stall your client.
Configuration and controls of encryted bucket
This section describes the configuration and controls of encrypted buckets using rclone tool. It goes about client-side encryption. Below are the guides for setup using the command line and for setup using the graphical user interface.